-
Templates
1099 FormsAccurately report 1099 information returns and ensure IRS filing with easeExplore all templatesW-9 W-8 FormsEasily manage and share taxpayer details to streamline payments and meet IRS requirements with confidenceExplore all templatesOther Tax FormsFillable tax forms simplify and speed up your tax filing process and aid with recordkeeping.Explore all templatesReal EstateReal estate templates for all cases, from sale to rentals, save you a lot of time and effort.Explore all templatesLogisticsSimplify your trucking and logistics paperwork with our ready-to-use transportation and freight templates.Explore all templatesMedicalMedical forms help you keep patient documentation organized and secure.Explore all templatesBill of SaleBill of Sale templates streamline the transfer of ownership with clarity and protection.Explore all templatesContractsVarious contract templates ensure efficient and clear legal transactions.Explore all templatesEducationEducational forms and templates enhance the learning experience and student management.Explore all templates
-
Features
FeaturesAI-Enhanced Document Solutions for Contractor-Client Success and IRS ComplianceExplore all featuresAI Summarizer Check out the featureAI PDF summarizer makes your document workflow even faster. Ask AI to summarize PDF, assist you with tax forms, complete assignments, and more using just one tool.Sign PDF Check out the featurePDFLiner gives the opportunity to sign documents online, save them, send at once by email or print. Register now, upload your document and e-sign it onlineFill Out PDF Check out the featurePDFLiner provides different tools for filling in PDF forms. All you need is to register, upload the necessary document and start filling it out.Draw on a PDF Check out the featureDraw lines, circles, and other drawings on PDF using tools of PDFLiner online. Streamline your document editing process, speeding up your productivity
- Solutions
- Features
- Blog
- Support
- Pricing
- Log in
- Sign Up


2022
2018
Ontario Standard Lease Agreement
Your Easy Way To Finalize The Lease
1. Complete the lease form
15 min
Enter all information and details about the property lease you discussed with the tenants when they applied.

2. Sign and send for signature
2 min
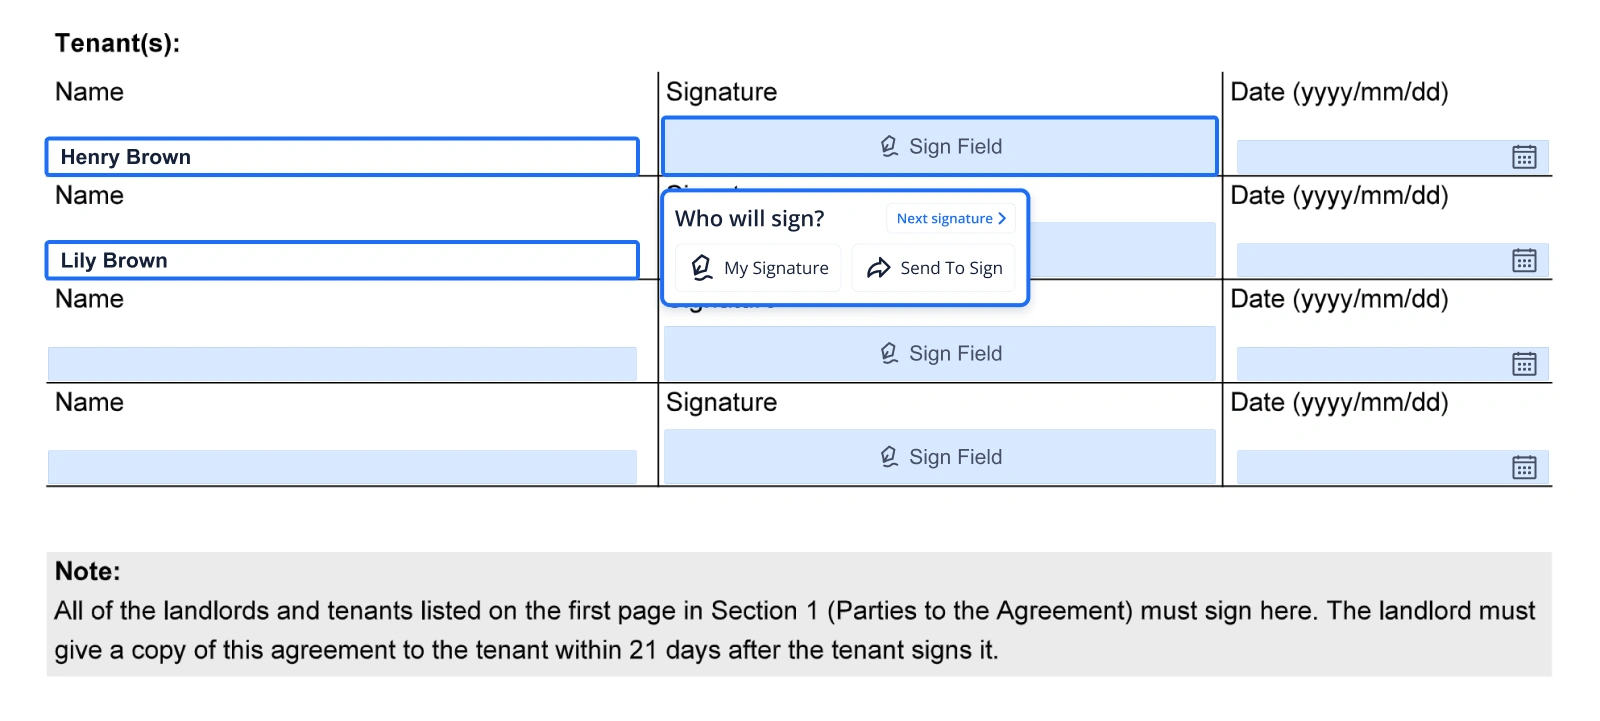
If you and the tenants agree to sign electronically: in section 17 on page 7, click the landlord "Signature field" and choose "My Signature" to add your eSignature. Then click the tenant's "Signature field" on the same page, choose "Send To Sign", enter the tenant's email and click "Send to Sign". If a "Please keep assigning recipients" prompt appears, check which signature fields have no signer. Before proceeding, make sure that every landlord and tenant listed in section 1 has signed or is assigned to the correct signature field. Use "Send to Sign" in that prompt only when the remaining unassigned fields are unused rows for people who are not parties to this lease; otherwise assign the missing recipients first.

3. Send copies to tenants
2 min
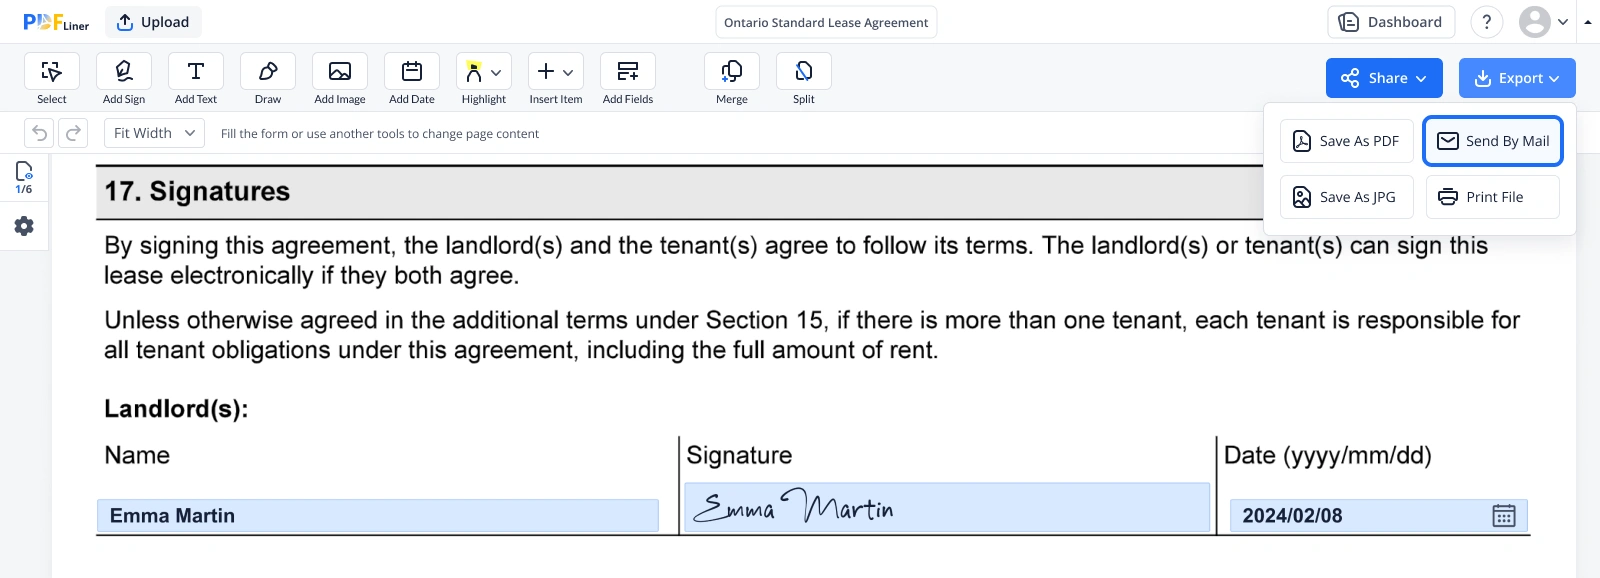
Once tenants sign the form, you have to give them a copy of the lease signed by both of you within 21 days after they sign it and give it to you. To email it (if they agreed to receive documents by email in section 3 of the lease), click “Export” and then choose “Send By Mail.”

Check & Sign Your Lease in 5 Minutes
1. Review your lease
4 min
Go through the digital lease your landlord sends over. Make sure all terms are clear and agreed upon.

2. e-Sign agreement
30 sec
Confirm your agreement by clicking “Sign Field” at the designated spot. No printing and scanning are required.

3. Confirm and Celebrate
30 sec
Click “Send document” to return your signed lease to the landlord and get ready to move into your new place!

What you need to know:
- 📎 Ontario standard lease should be filled out by a landlord and signed by both landlord and tenants.
- 📎 Any additional terms that conflict with the Residential Tenancies Act, 2006 or with the standard terms of the lease are void (not valid) and cannot be enforced. Disputes about such terms can be taken to the Landlord & Tenant Board (LTB).
- 📎 The landlord must give the tenant a copy of the agreement, signed by both, no later than 21 days after the tenant signs it and gives it to the landlord.
- 📎 If the landlord does not give the tenant a copy of the signed lease within 21 days after the tenant signs it and gives it to the landlord, the tenant's obligation to pay rent is suspended until the landlord provides it (section 12 of the RTA; once the copy is provided, the landlord can require the withheld rent).
- 📎 If the tenancy is one for which the standard lease is required and the landlord did not use it, the tenant can, once during the tenancy, demand in writing a proposed lease in the standard form for the same unit, signed by the landlord. If the landlord has not provided it within 21 days, the tenant can withhold rent payments that come due after that, up to one month's rent in total, and cannot withhold rent from the day the landlord provides it. If the landlord provides it no later than 30 days after the first withheld payment, the landlord can require the withheld rent, even if the tenant does not sign the proposed lease; otherwise the tenant can keep it (section 12.1 of the RTA). For a qualifying yearly or fixed-term tenancy, RTA section 47.0.1 permits early termination after that written demand if at least 21 days have passed without the landlord complying, or if the landlord supplies the proposed standard lease and the tenant does not enter into it. Once the landlord supplies the proposed lease, the tenant must give the termination notice no later than 30 days afterwards. Use the LTB's N9 notice and follow its service instructions. Normally, the notice must give at least 60 days and end on the last day of a rental period, but it need not wait until the fixed term ends; N9 explains the special February and March timing rule. The written demand alone does not end the tenancy.
- 📎 In Ontario, a rent deposit can't be more than one month's rent or the rent for one rental period (e.g., one week in a weekly tenancy), whichever is less; it cannot be used as a damage deposit, and the landlord must pay interest on it every year.
Ontario Standard Lease Agreement: What Is It For
The fillable Ontario Standard Lease form is a contract between a landlord and a tenant created by the Government of Ontario to standardize rental agreements within the province, ensuring all parties have a clear, concise understanding of their rights and responsibilities under the lease.
This template aims to protect both landlords and tenants by providing a comprehensive outline of the rental arrangement, including rent details, rules about the use of the property, and terms of tenancy.
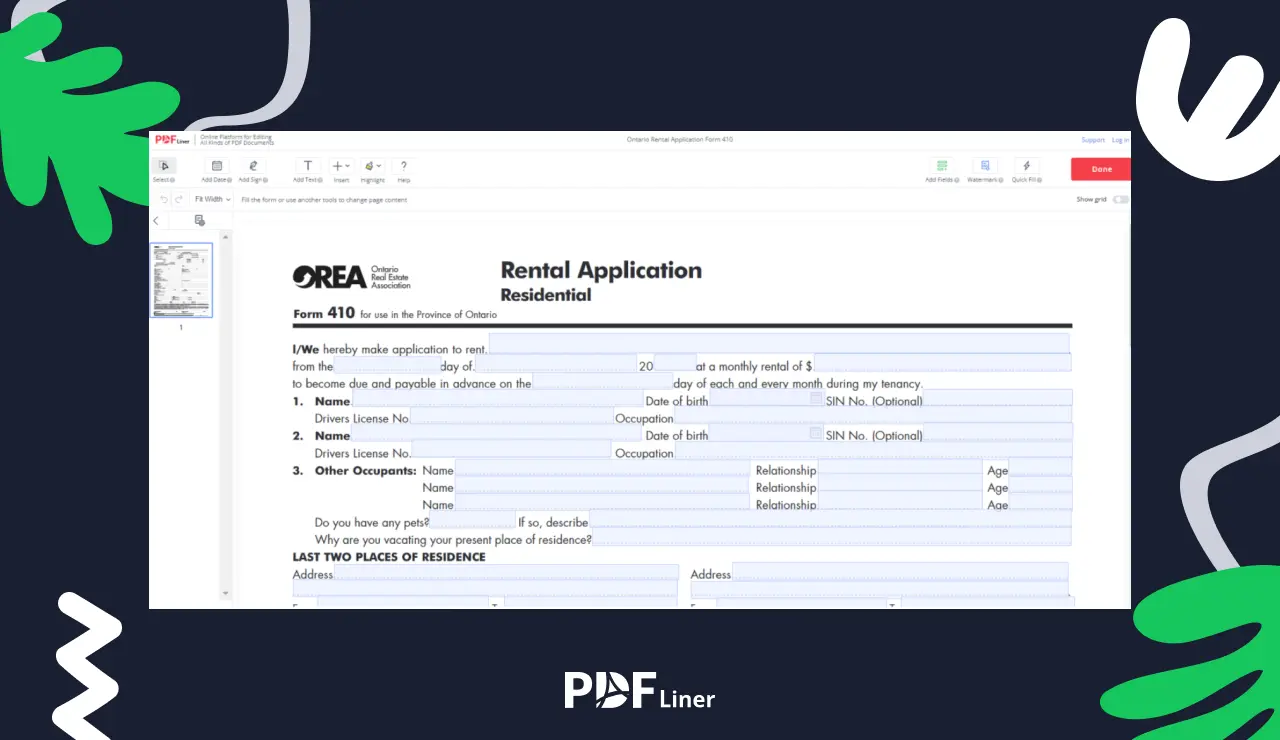
Need a rental application before the lease? Use PDFLiner's own generic Ontario rental application template.
Standard Ontario Lease Agreement template is needed for the following:
- setting out, in writing, the terms of the tenant's occupancy of the rental unit (a tenancy can still exist, and is not void, if the landlord fails to use the standard lease).
Note:
Any additional terms that conflict with the Residential Tenancies Act, 2006 or with the standard terms of the lease are void (not valid) and cannot be enforced. Disputes about such terms can be taken to the Landlord & Tenant Board (LTB).
Ontario Standard Lease at a Glance
| Official name | Residential Tenancy Agreement (Standard Form of Lease) |
| Who must use it | Landlords of most private residential rental units in Ontario, for tenancies entered into on or after April 30, 2018 (care homes, most social and supportive housing, co-operative housing and some other tenancies are exempt) |
| What comes before it | Sometimes a rental application (OREA Form 410) and an Agreement to Lease (OREA Form 400) |
| Language versions | English and French |
How To Fill Out the Ontario Standard Lease Agreement
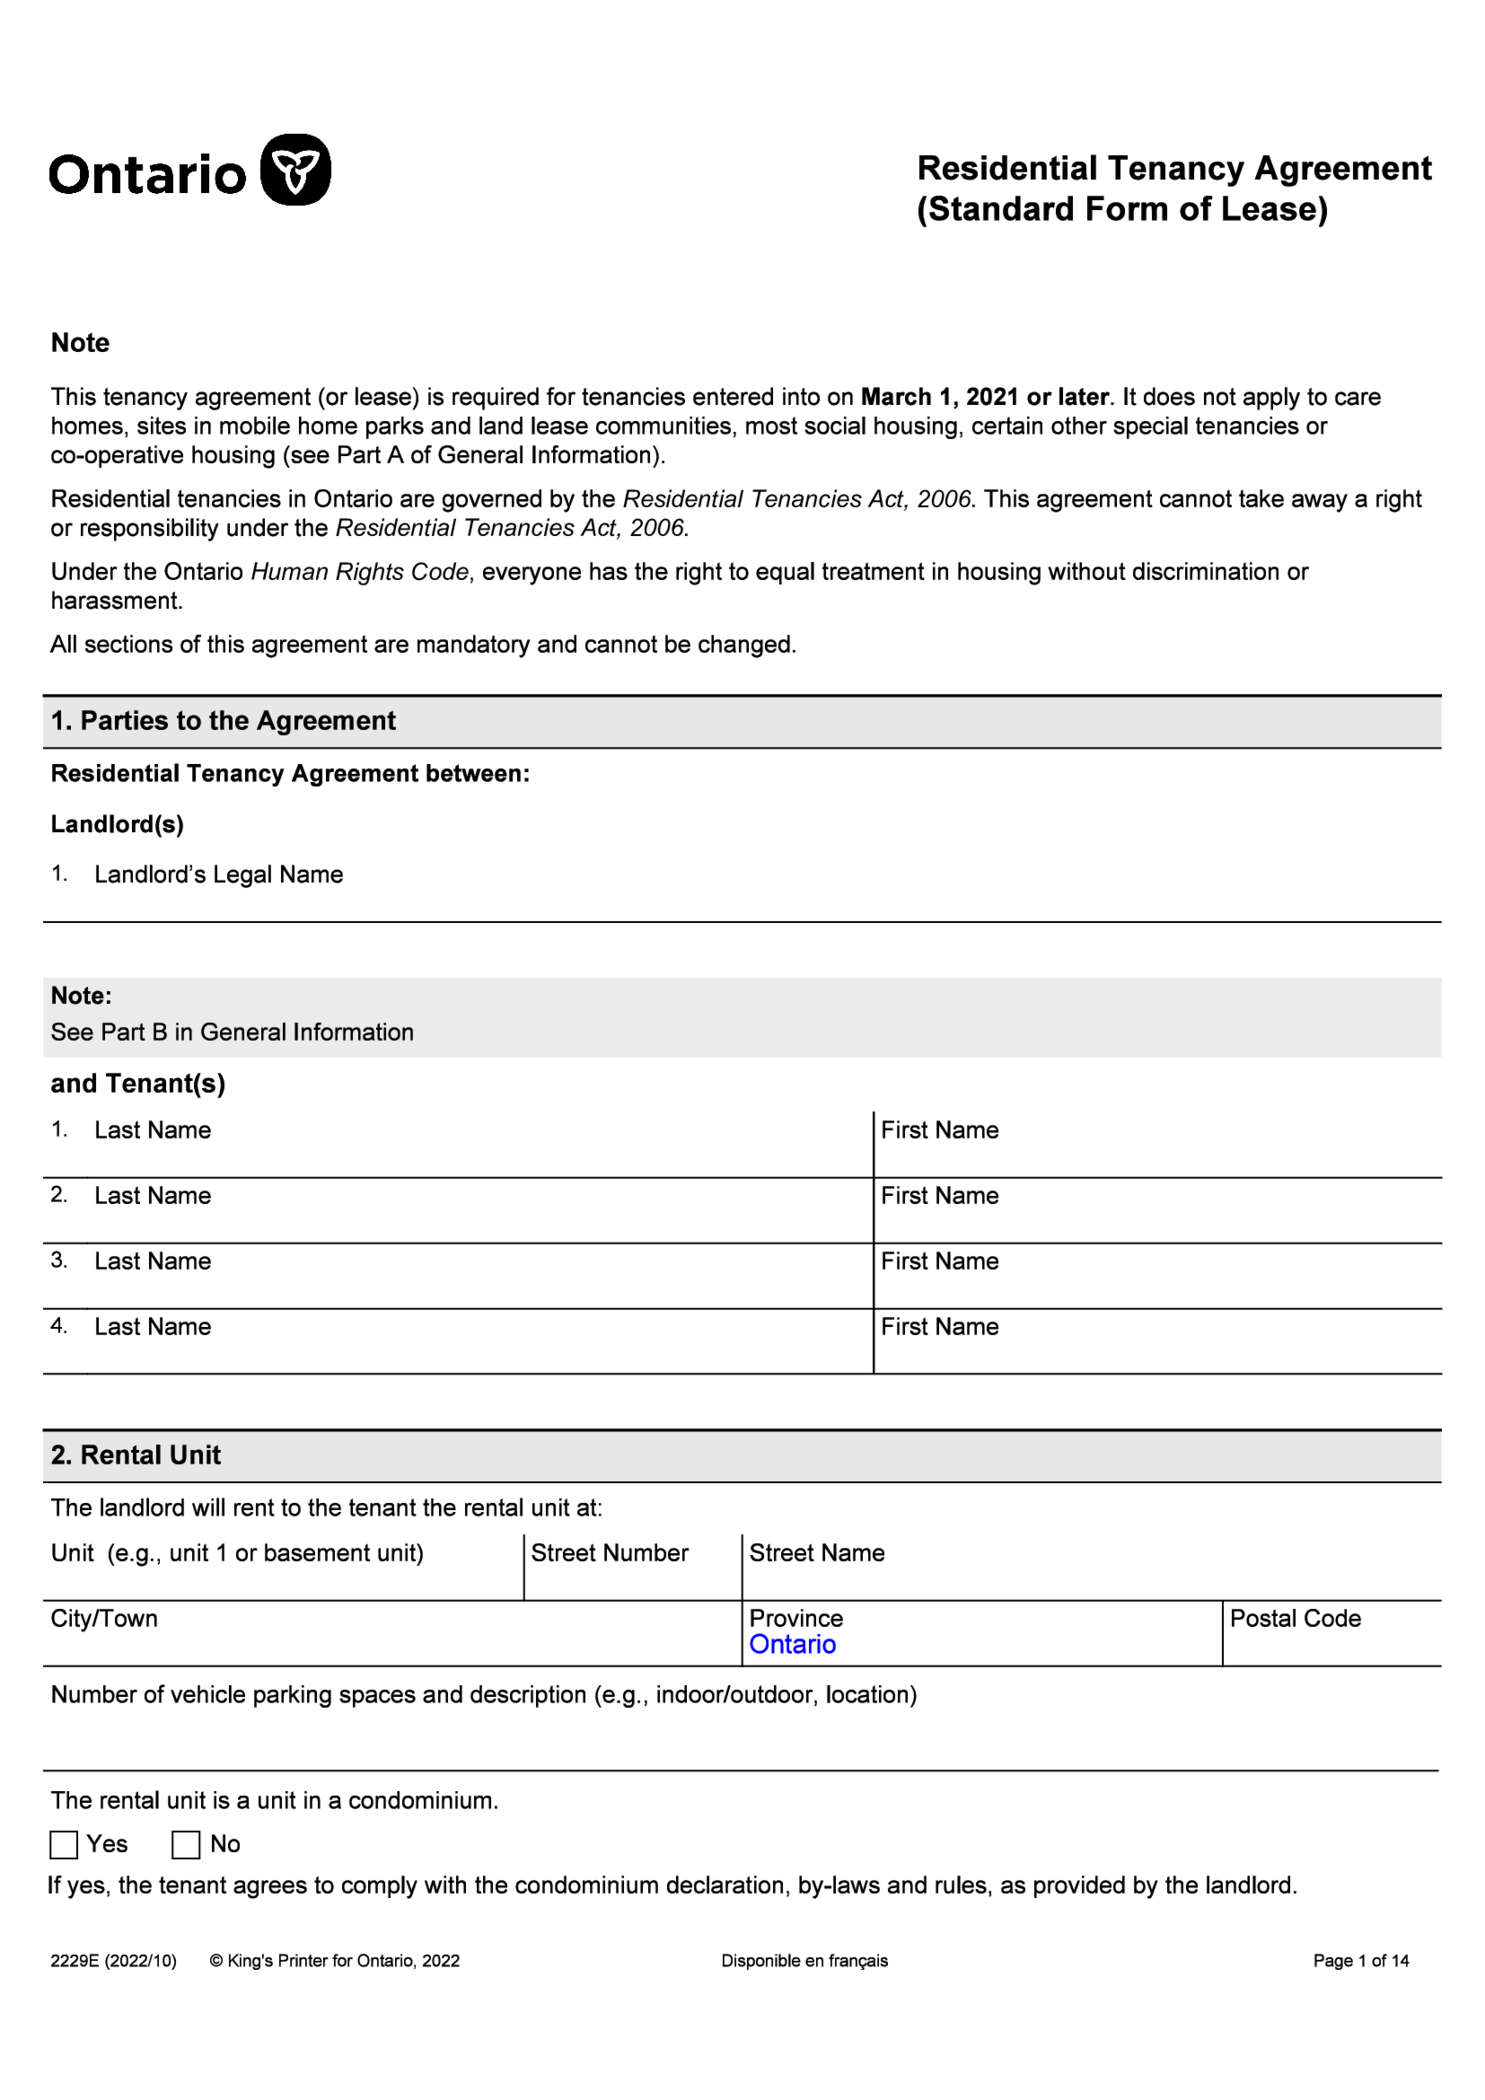
The document has 14 pages: seven fillable pages, six informative pages (Appendix: General Information) and a final page pointing to the Guide to the Standard Lease. Here are the step-by-step instructions for completing the form:
Step 1: Prepare
Before you complete the Standard Lease, the landlord and the tenant(s) agree on the rental terms. Some landlords use OREA forms for these earlier steps; what Ontario requires for most private tenancies is the Standard Lease itself. For example, you can:
- Ask all the potential tenants to complete the rental application and check the information they provided. Screen all applicants consistently and without discrimination: the Ontario Human Rights Code covers the process of choosing tenants.
- Once you've found your perfect tenants, discuss the terms of your lease. The terms can be set out in Form OREA 400, which records a tenant's offer to lease the property from the landlord.
If you use Form 400 and accept the tenant's offer before it expires (and the tenant is notified of the acceptance), both sides are bound by the accepted agreement to enter into the lease on its terms; you then complete this Standard Lease. If the tenants have issues with the terms, keep negotiating or look at other candidates before you accept an offer: after acceptance, do not assume you can still choose a different tenant just because the Standard Lease has not been signed yet.
Step 2: Get the Ontario lease agreement PDF
To start filling out the form, you can click the “Complete the Lease” button and be transferred directly to a user-friendly editor with an AI assistant that can guide you through the process, or you can download the form from an official Ontario website.
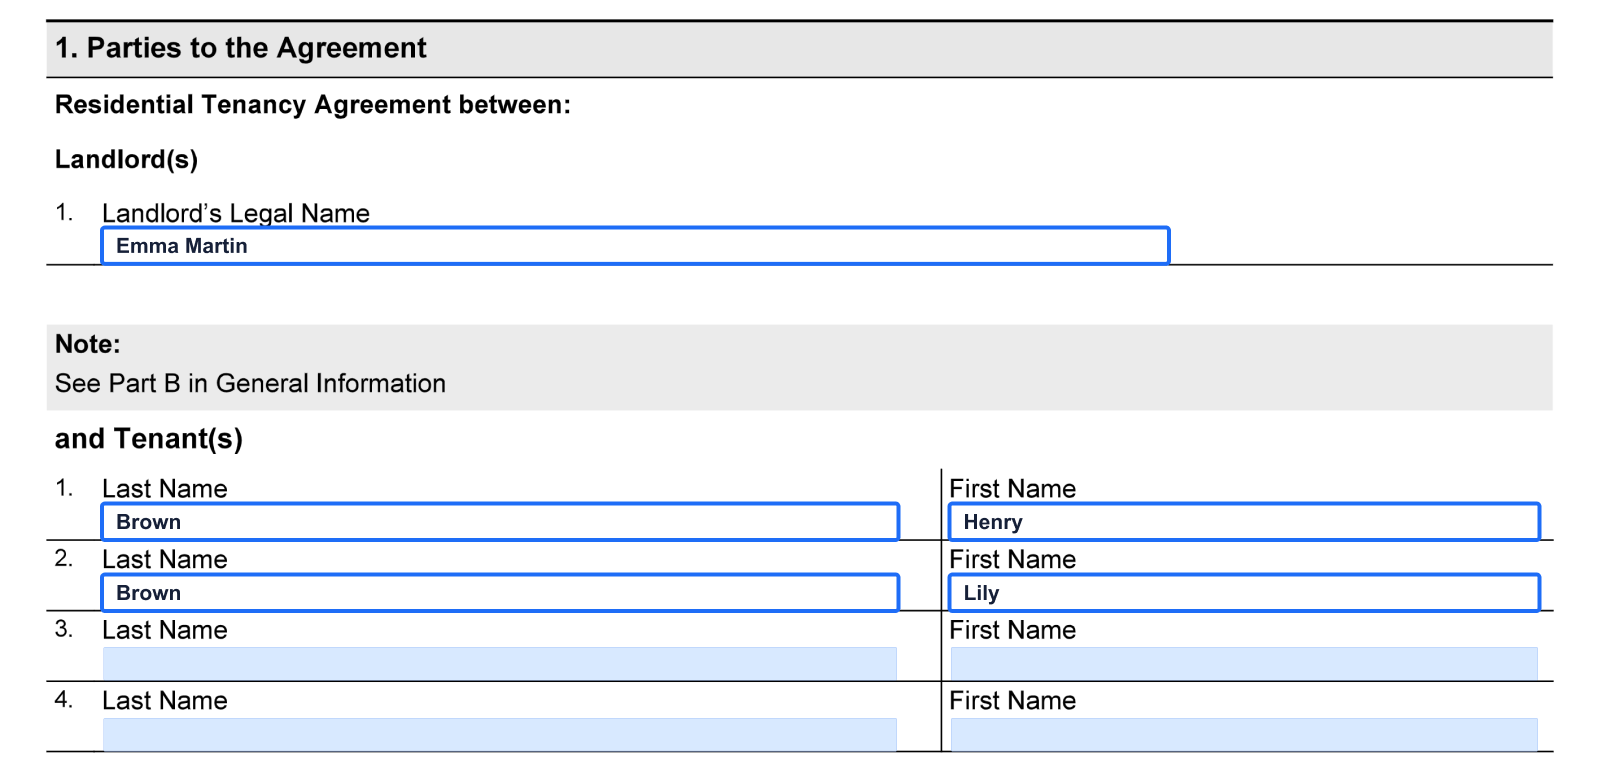
Step 3: Mention all parties of the agreement
In this section, you need to specify your and tenants' full names. Try to list all the tenants that will live on the property to avoid future misunderstandings about who is a tenant (the lease usually identifies the tenants; an occupant who is not a tenant has no tenant rights under the lease).
Section 1 lists the landlord(s) and tenant(s): everyone listed there must sign, and unless the additional terms under Section 15 say otherwise, each tenant is responsible for all tenant obligations under the agreement, including the full amount of rent.
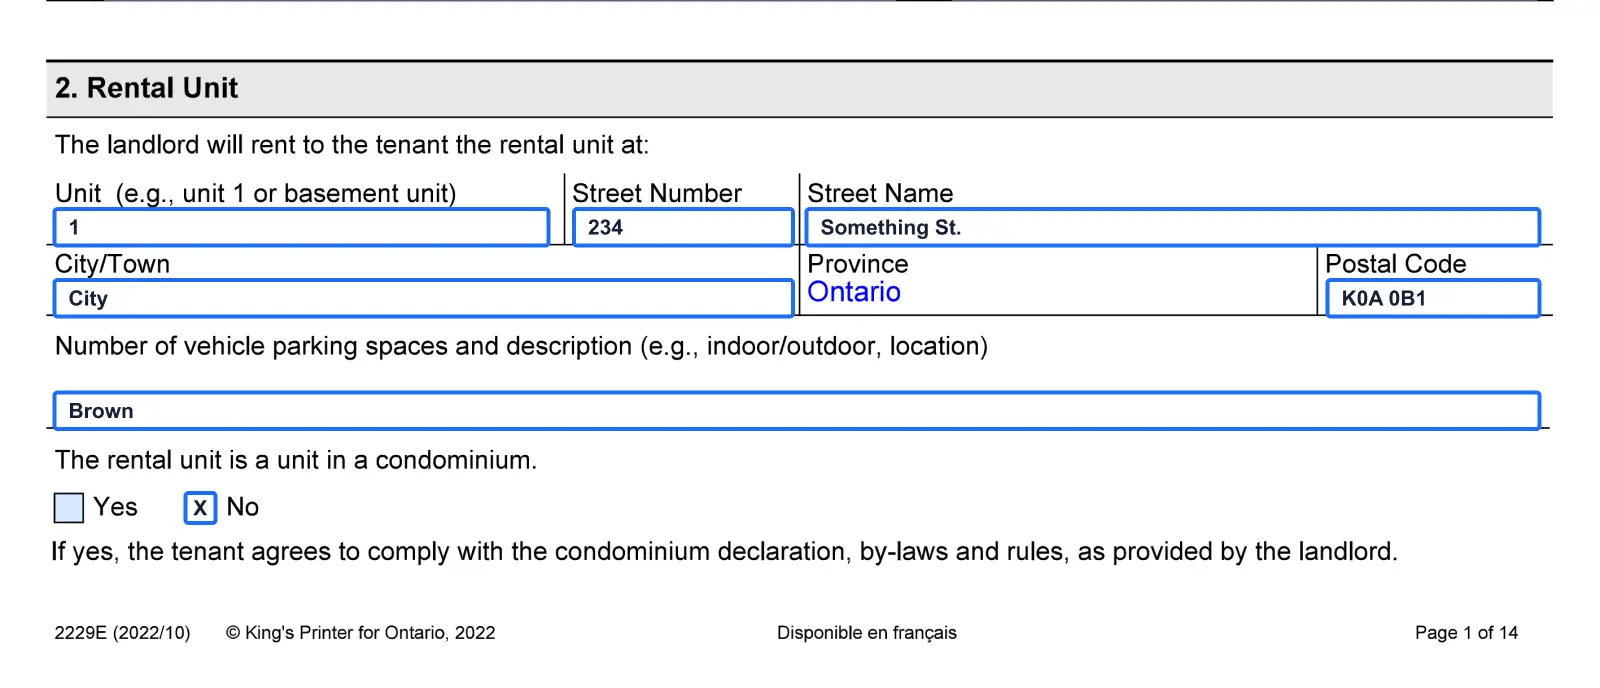
Step 4: Write the address of the property
Specify the address of the unit that you are renting to the tenant. It's important to provide full and correct information in this section. The same section records the number and location of any parking spaces and whether the unit is in a condominium; if it is, the tenant agrees to follow the condominium declaration, bylaws and rules that the landlord provides.
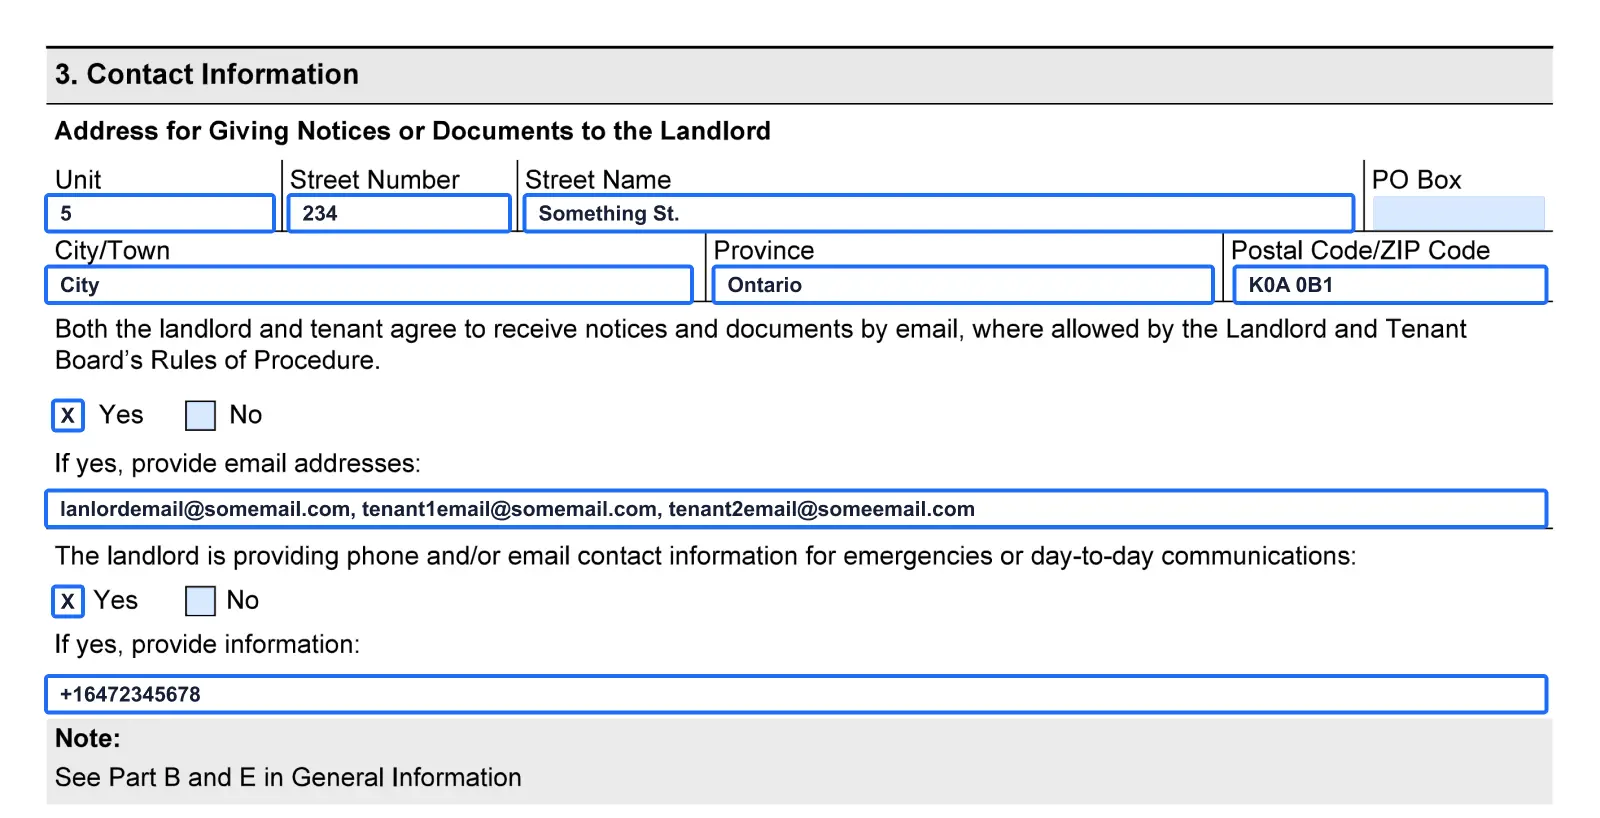
Step 5: Specify all the contact details
In the next part of the Residential Tenancy Agreement, you should add the following:
- 1. Your address where tenants can send you notices or other documents.
- 2. Whether you and the tenants agree to receive notices and documents by email (where the Landlord and Tenant Board allows it), and your email addresses if so.
- 3. Your emergency or daily contact phone number or email address.
Step 6: Terms of tenancy
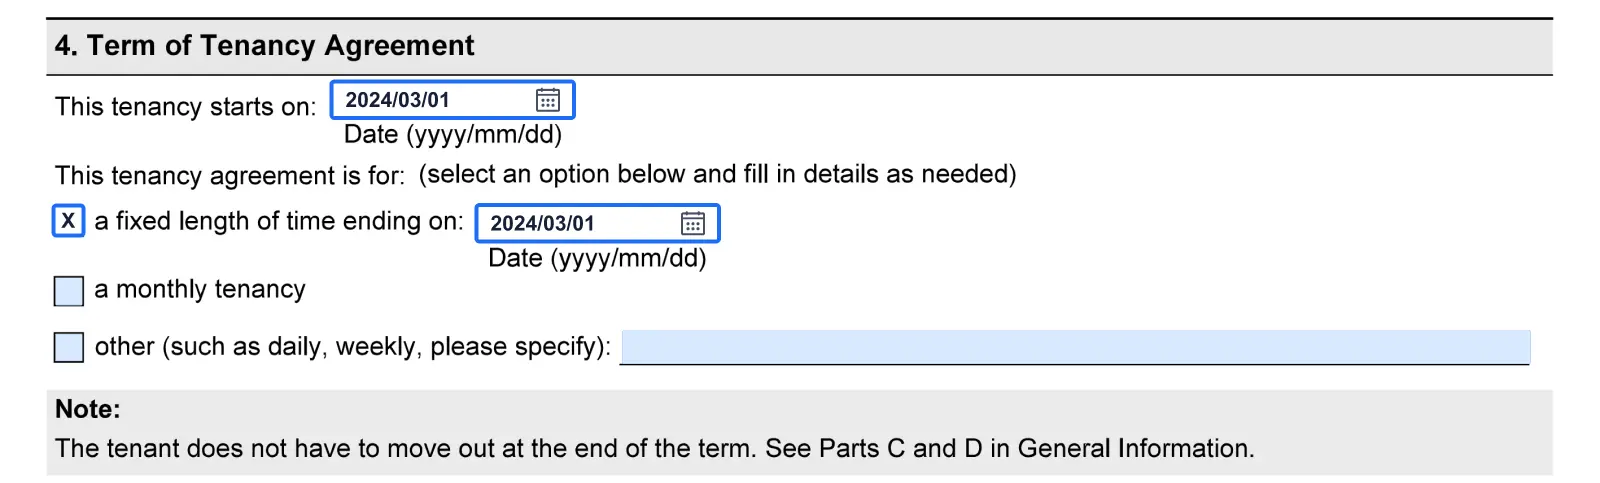
Indicate whether the tenancy is for a fixed term or on a month-to-month or other periodic basis. If it's a fixed term, specify the start and end dates. For periodic tenancies, note the start date and the interval of the tenancy (e.g., month-to-month).
In this example, we have a fixed-term tenancy that will last a year, so we specify the lease agreement's first and last day of the lease agreement.
Step 7: Calculate rent
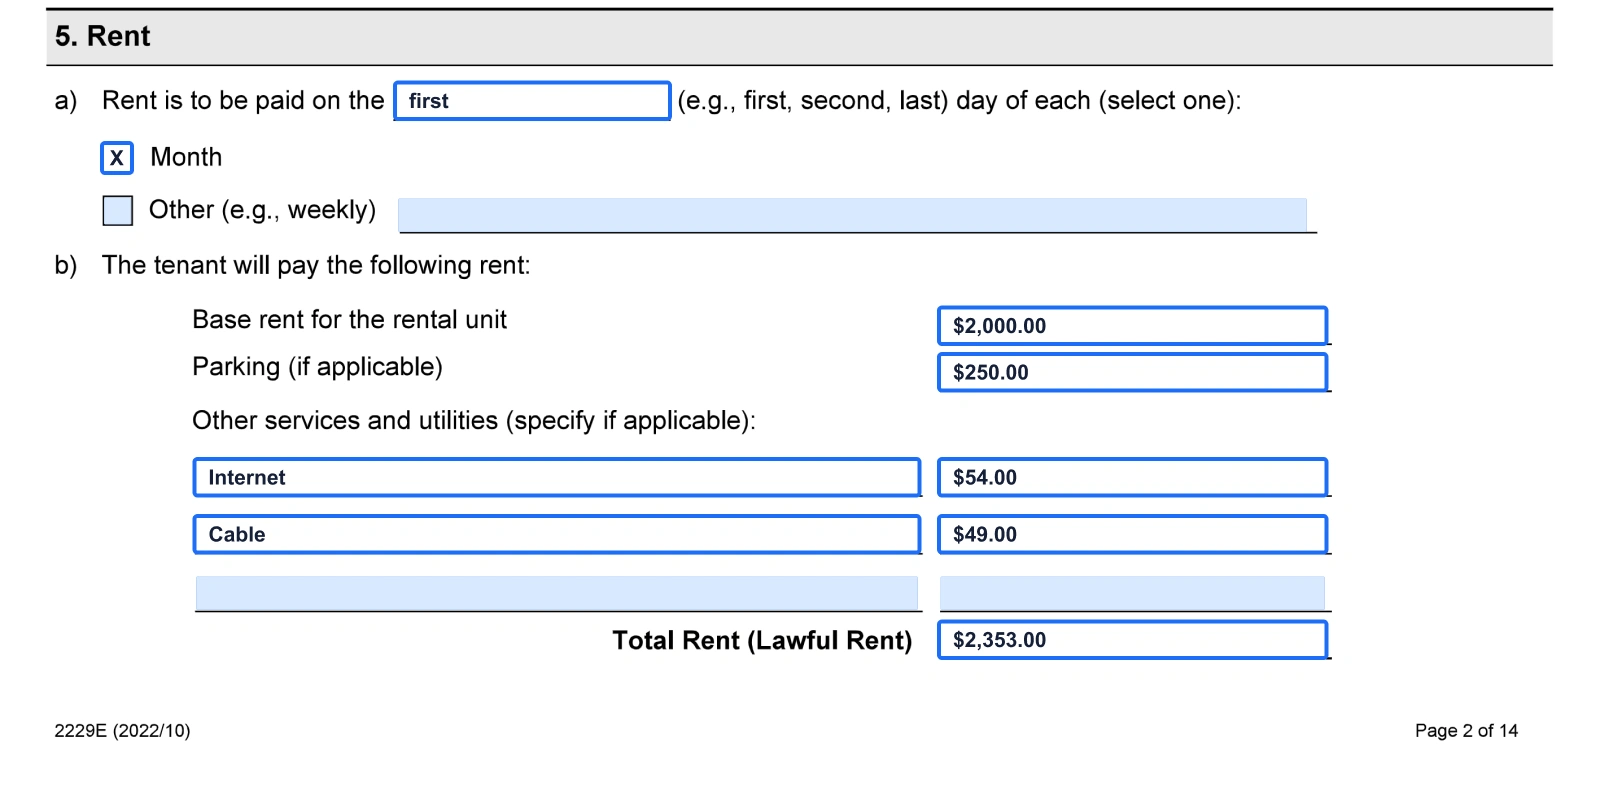
This is one of the most important parts of the agreement. Here you should enter:
- 1. When the rent must be paid;
- 2. Amount of a base rent;
- 3. Cost of parking (optional);
- 4. Cost of additional services and utilities, like internet and cable;
- 5. Finally, sum up all the numbers and write the total rent amount per 1 period.
In this example, rent will be paid on the first day of each month, and the base rent of $2,000 will be added to the cost of parking ($250), internet ($54), and cable ($49). The total rent per month will be $2,353.
Step 8: Rent payment terms
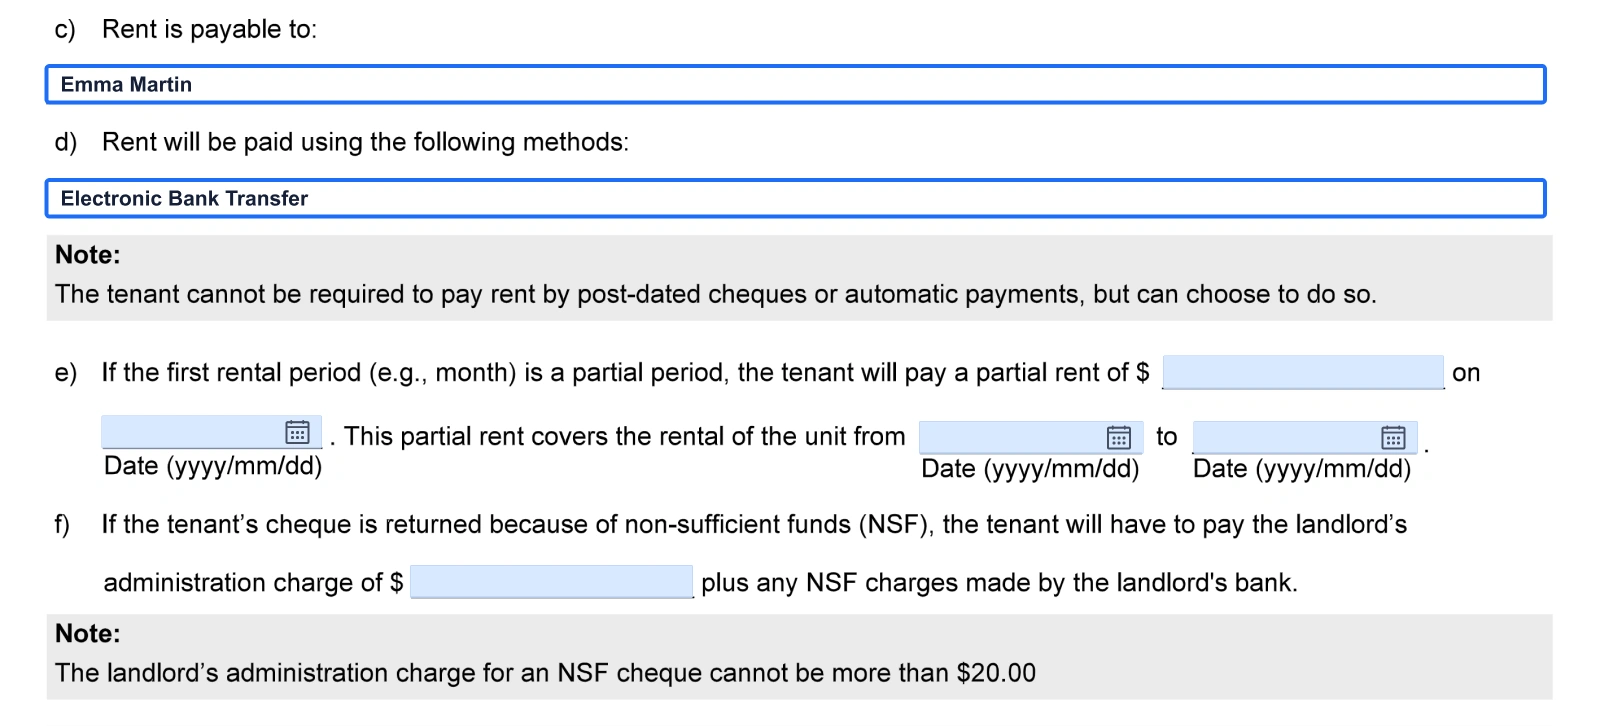
Next, write who the rent is payable to (the "Rent is payable to" field) and the payment methods, like electronic bank transfer, check, or cash (the form gives a free-text line for this). The tenant cannot be required to pay rent by post-dated checks or automatic payments, but can choose to do so.
Then, specify if the first rental period is a partial period. For example, if the tenancy starts on the 20th day of a 30-day month (the day the tenant is entitled to occupy the unit), the partial rent covers the 20th to the 30th (11 days), and the tenant then pays the monthly rent on the 1st day of the following month if that is the agreed due date. Moving in later than the start date does not by itself reduce the rent: the tenancy begins on the day the tenant is entitled to occupy the unit, whether or not the tenant actually moves in that day.
If the tenants pay by check and it was returned to you because of non-sufficient funds, you can also specify the amount of additional administration charge, but no more than $20.
Here, only fill out the first 2 fields and leave the rest blank because tenants will move in on the first day of the month and pay by electronic bank transfer.
Step 9: Specify included services
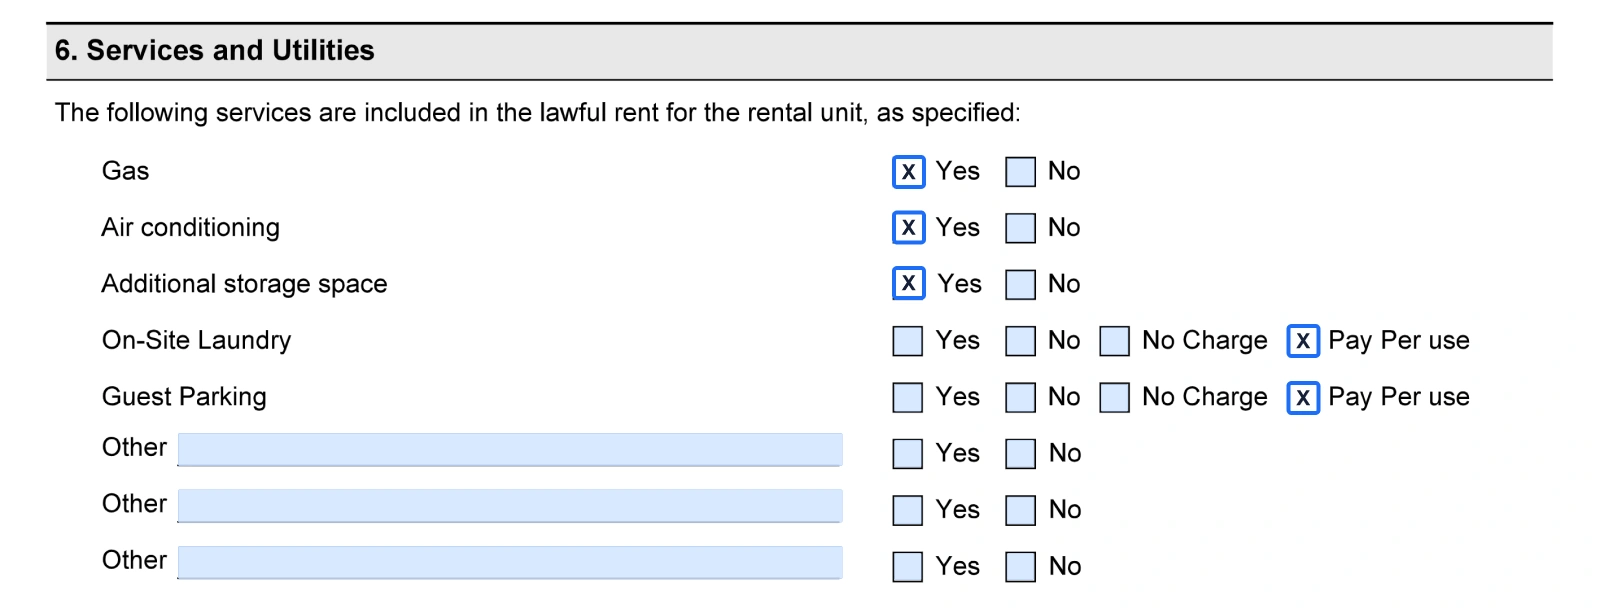
In this part, you should specify what services will be included in the rent. Record what you and the tenant agreed for each service, rather than assuming a service is included because the building has the equipment. Mark each service "Yes" (included) or "No" (not included); for on-site laundry and guest parking, you can also choose "No Charge" or "Pay Per Use".
If you choose the “Pay Per Use” option, it's better to write additional information about the cost of use later in the part.
Step 10: Who is responsible for utilities
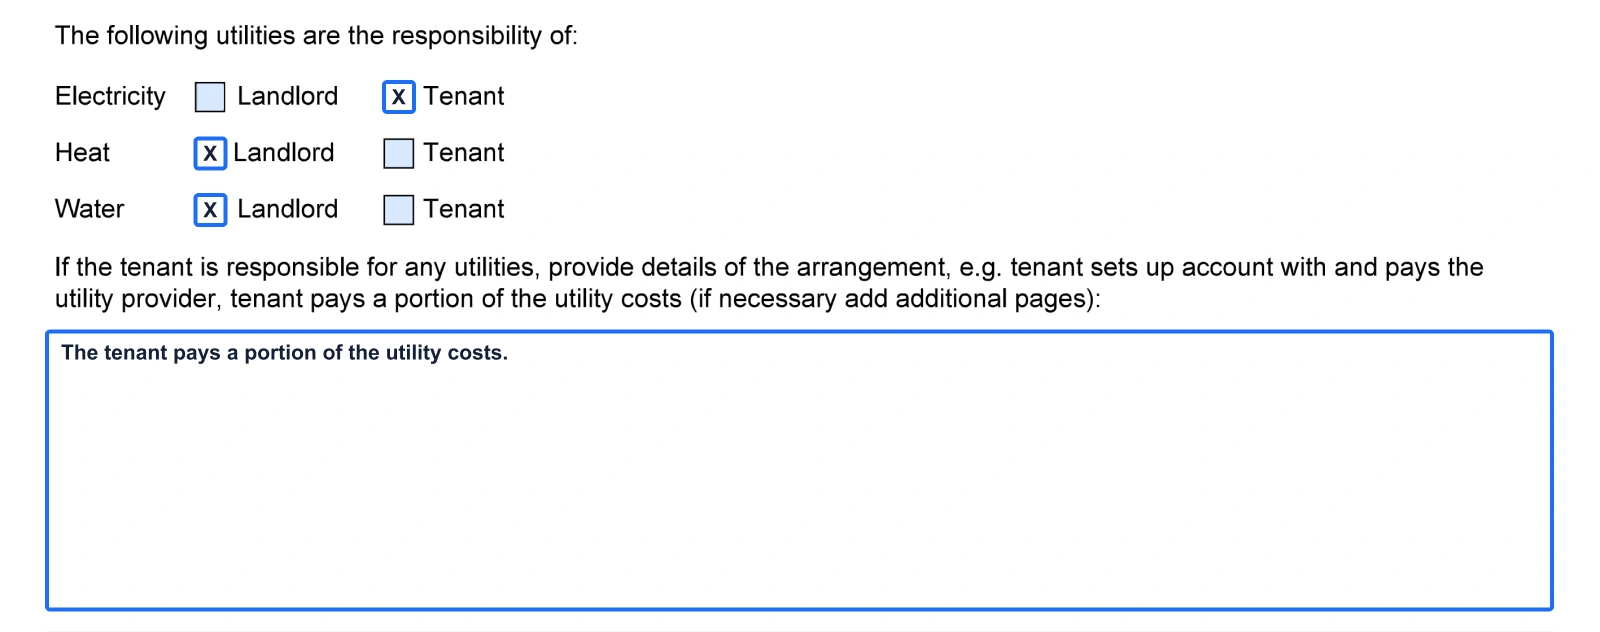
Here is where you answer the question of who should pay for the principal utilities: electricity, heat, and water. Specify the terms later if your tenant is responsible for some or all utilities. Here is a list of possible details of the arrangement:
- 1. The tenant pays a portion of the utility costs (a share that changes with the bill is not rent, so it is not added to the total lawful rent).
- 2. The landlord pays the utility and charges the tenant a fixed monthly amount for it, which is listed in section 5 as part of the total (lawful) rent.
- 3. The tenant sets up an account with and pays the utility provider.
Do not assume that any percentage split, such as an even split, is allowed. If the landlord supplies a utility to each unit in a building with up to six rental units and charges the tenant a portion of its cost, section 138 of the Residential Tenancies Act, 2006 requires the tenant's written consent and compliance with the prescribed rules (O. Reg. 394/10), which set how the portion is calculated. Before the lease is signed, the landlord must also tell the prospective tenant the unit's portion as a percentage of the total cost and the building's total cost of that utility for the most recent 12 months. Check these rules before agreeing on a split.
Step 11: Rent discounts
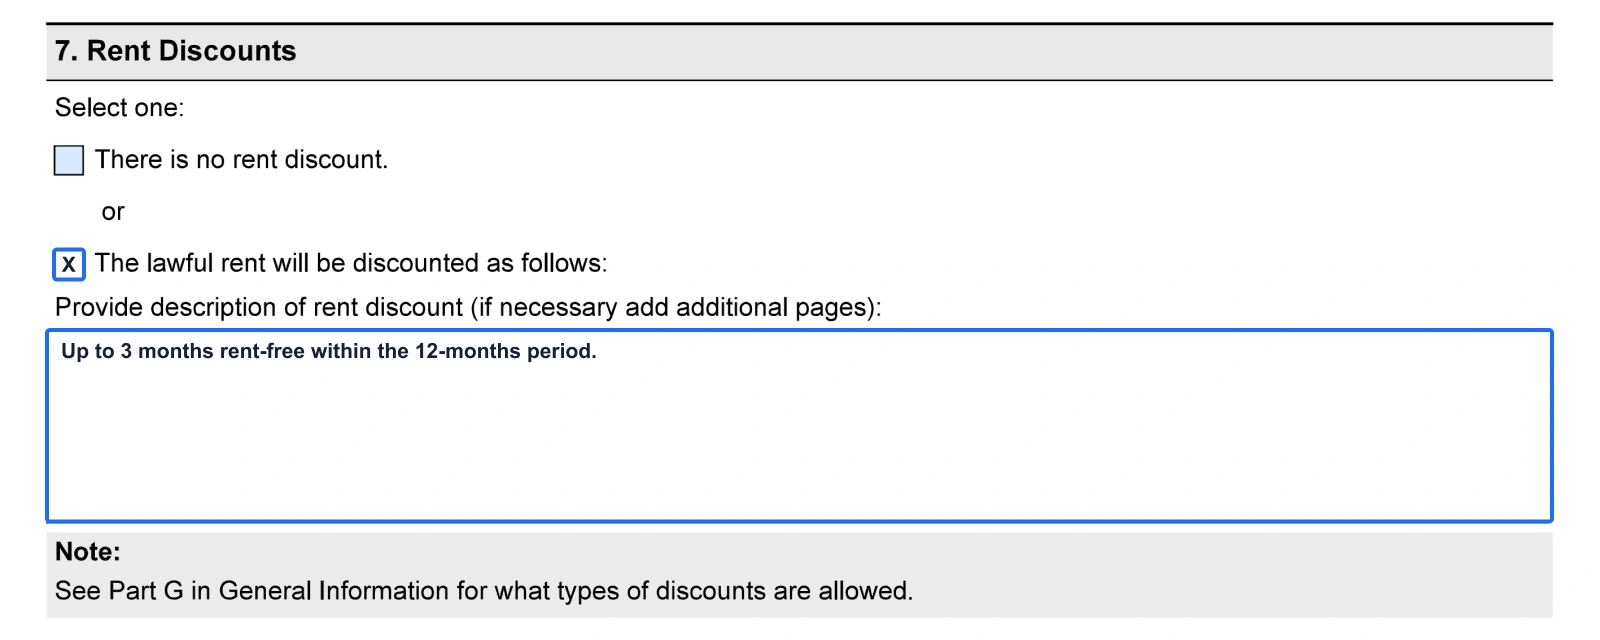
If you want to make your property more attractive to potential tenants or reward current tenants for their loyalty and good behavior, consider including rent discounts in your lease agreement (see the Ontario government's guide to the standard lease (March 2021 edition)). This could involve one of the following, which must be agreed to in writing:
- Up to 3 months rent free within any 12-month period.
- A discount of up to one month's rent spread evenly over eight months,
- A discount of up to two months' rent, with up to one month's rent spread evenly over the first seven months and up to one month's rent discounted in one of the last five months.
The landlord can also offer a discount of up to 2% of the lawful rent for paying rent on or before the date it is due.
Step 12: Rent deposit
Note:
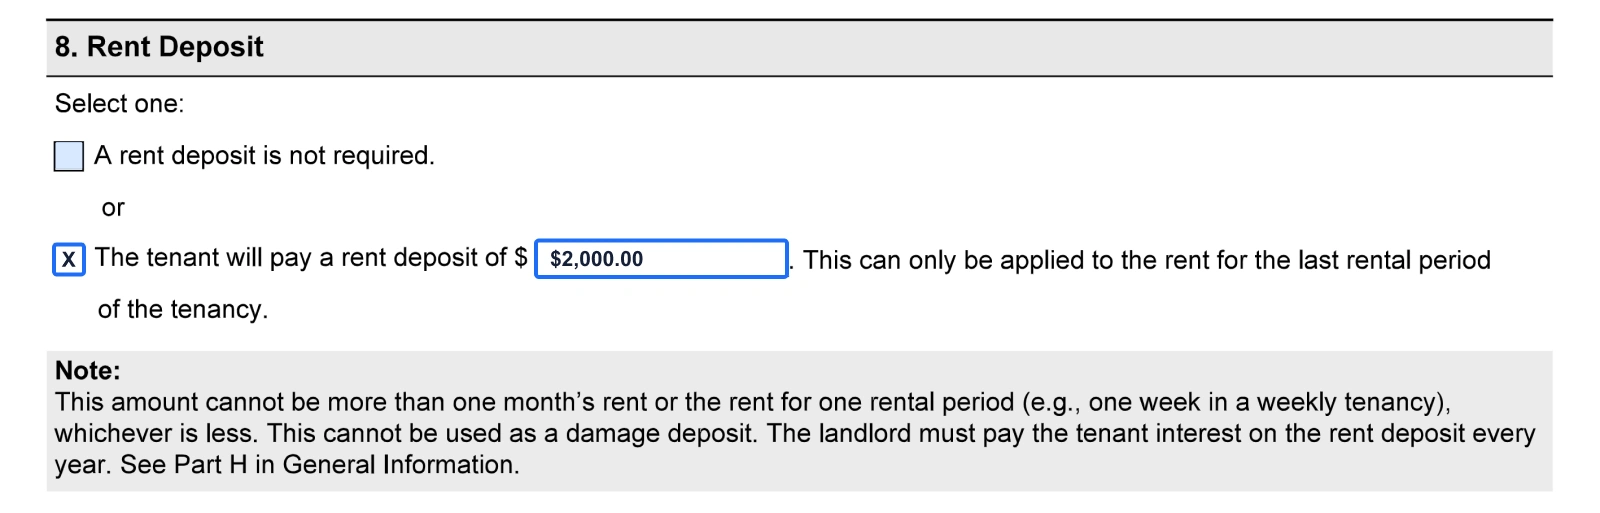
In Ontario, a rent deposit can't be more than one month's rent or the rent for one rental period (e.g., one week in a weekly tenancy), whichever is less. It cannot be used as a damage deposit; it can only be applied to the last rental period, and the landlord must pay interest on it every year.
Step 13: Additional terms and conditions
Once you've filled out the most essential parts of the Ontario Standard Lease, you need just to read the rest of the terms and conditions in parts 9 - 16 and occasionally choose:
- 1. Whether there will be a refundable key deposit (it cannot be more than the expected replacement cost of the keys or devices).
- 2. What are the smoking rules.
- 3. Whether the tenant must have liability insurance.
- 4. Whether you would like to add some additional terms.
Note:
The additional terms that you attach to the agreement should be written in plain language and can't conflict with the RTA, 2006.
Step 14: Sign the agreement
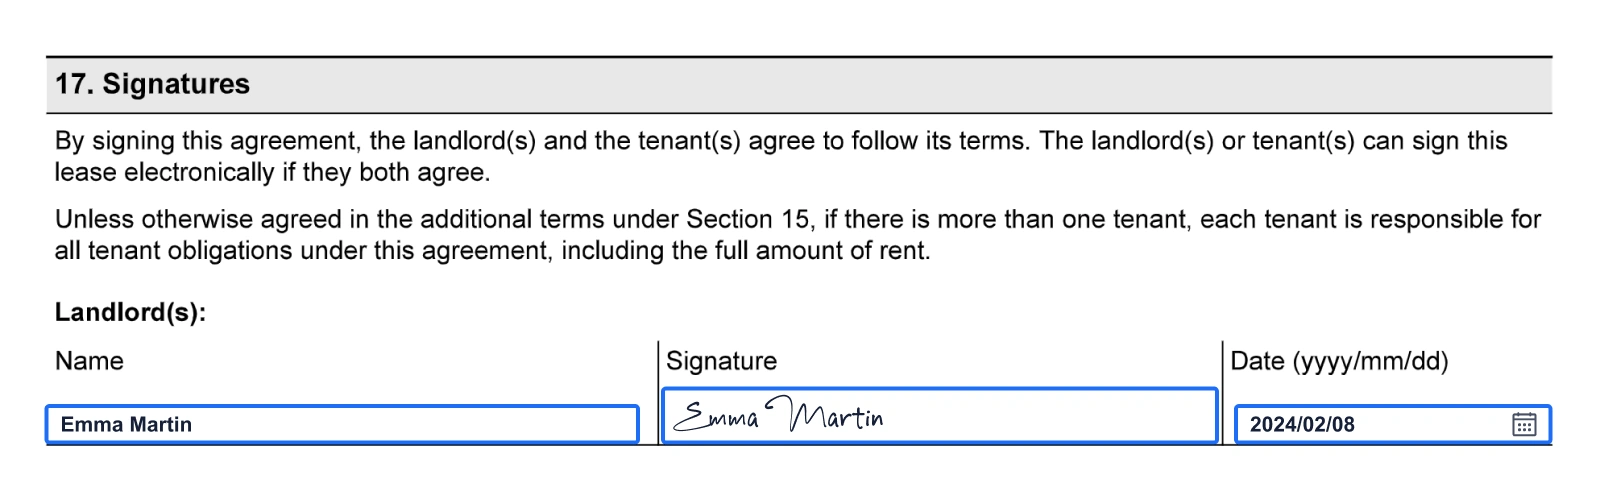
When you've read and understood all the parts of the lease agreement and the appendix with general information, you can sign and date the form (the landlord(s) and tenant(s) can sign the lease electronically if they both agree). For a tenancy that must use the standard lease, the landlord and the tenant must sign it on or before the day the tenant is entitled to occupy the unit (RTA s. 12.1(2)):
- 1. Click on the “Signature Field”.
- 2. Select the “My Signature” option.
- 3. Use one of the methods to create your signature.
- 4. Click the “Sign” button.
- 5. Choose a current date on the calendar next to the sign field.
What To Do With the Completed Lease Agreement
When you signed the agreement, the first thing you need to do is double-check if everything is correct and then proceed to the next step:
- Click the “Sign field” and choose the “Send to Sign” option. Assign an email to each field from the tenant who should sign the agreement, then click the “Send to Sign” button.
- Once you receive an email notification that the agreement has been signed, you can follow the link and open the agreement in the editor again. Now, you can choose the “Export” button and the “Send by Mail” option to email your tenants a copy of the signed agreement if they agreed to receive documents by email (section 3 of the lease has this option). The landlord must give the tenant a copy, signed by both, within 21 days after the tenant signs it and gives it to the landlord.
Ontario Standard Lease Agreement Useful Tips
Getting the Ontario Standard Lease Agreement right can smooth the path to a harmonious landlord-tenant relationship. Here are some helpful tips to consider:
1. Read thoroughly
Landlords and tenants should carefully read the agreement before signing. This ensures an understanding of all rights and responsibilities.
2. Check for completeness
Double-check that all necessary fields are filled out. Complete every section of the agreement: where a section asks you to select an option, choose the one that applies (for example "no" or "not required") instead of leaving it blank, and fill in details only where they apply; some sections are fixed text that you only read. This can help avoid disputes related to ambiguous or missing information.
3. Document unit condition
Before moving in, tenants and landlords should review the unit together, documenting its condition. Take pictures or videos as evidence to help with future disputes about damages.
4. Understand the law
Familiarize yourself with Ontario's Residential Tenancies Act. Knowing the law can help ensure the lease agreement complies with provincial regulations and protects both parties' rights.
5. Keep copies
The tenant and the landlord should keep a signed copy of the lease agreement. These documents are important for reference in case any issues arise during the tenancy.
6. Prepare for the end of the lease term in advance
As the end of the lease term approaches, both parties can discuss whether to sign a renewal or a new agreement. The end of the agreement does not mean the tenant has to move out or sign a renewal or new agreement in order to stay. The rules of the agreement still apply and, unless the tenancy is lawfully ended or renewed, it continues automatically as a monthly tenancy after a fixed-term or monthly tenancy, as a weekly tenancy after a weekly tenancy, or as a daily tenancy after a daily tenancy. Understanding the correct procedures is crucial.
7. Seek legal advice
If there are any doubts or complex issues, consider seeking advice from a legal professional experienced in Ontario's residential tenancies laws. This can provide peace of mind and prevent potential legal challenges.
Remember, a well-prepared lease agreement is the foundation of a good rental experience. Following these tips can help make the leasing process smoother and more enjoyable for everyone involved.
Table of contents
Fast-Track to Finalizing Your Lease
With our easy-to-use service, you can quickly complete, sign, send for signature, share the copy, and store your Ontario Standard Lease Agreement all in one place.


Prepare your Standard Lease with ease of mind